How to Add Klarna Payments to WordPress (2 Easy Ways)
Are you looking for a way to offer Klarna payments on your website or eCommerce store?
Klarna allows you to add financing and installment plans to your website. You can use it to offer a ‘Buy Now, Pay Later’ option and encourage customers to purchase products.
In this article, we’ll show you how to add Klarna payments to WordPress.


What is Klarna & Why Add It to WordPress?
Klarna is a Swedish fintech company offering online payment methods for website and online store owners.
Adding Klarna to your online store can help boost conversions and average order value. It makes it convenient for customers to purchase an expensive product or luxury items they want and pay over time.
Klarna offers 4 ways customers can buy now and pay later for a product:
- split the purchase amount into 4 interest-free payments
- use a debit or credit card to pay the total amount
- purchase a product now and pay in 30 days
- get financing for your purchase and pay installments over 6 to 24 months.
However, an important thing to remember is that Klarna’s payment options depend on your customer’s location. For example, in the United States, customers can get installment and financing options, but not the ability to pay in 30 days or fully pay using a credit card.
That said, let’s see how you can add Klarna payments in WordPress. We’ll show you 2 methods, including WP Simple Pay and WooCommerce. You can click the links below to jump ahead to your preferred section.
Method 1: Add Klarna Payments Using WP Simple Pay
The easiest way of adding Klarna payments in WordPress is by using WP Simple Pay. It is the best Stripe payment plugin for WordPress and allows you to easily collect online payments using Klarna, with no need to set up a shopping cart.
For this tutorial, we’ll use the WP Simple Pay Pro plan because it includes the Klarna payment forms and ‘Buy Now, Pay Later’ option. There is also a free version of WP Simple Pay you can use.
The first thing you need to do is install and activate the WP Simple Pay plugin. If you need help, then please see our guide on how to install a WordPress plugin.
Upon activation, the plugin will launch the setup wizard. You can simply click the ‘Let’s Get Started’ button to continue.


On the next screen, you’ll need to enter the license key. You can find the license key in your WP Simple Pay account area.
After that, go ahead and click on the ‘Activate and Continue’ button.


Next, the plugin will ask you to connect your Stripe account. Stripe is a payment gateway that lets you accept online payments with ease.
Simply click the ‘Connect with Stripe’ button.


You can now log in to your Stripe account and follow the onscreen instructions to connect the payment gateway with WP Simple Pay.
If you don’t have a Stripe account, then you can create one. Anyone with a legitimate business can set up a Stripe account. In addition, you’ll need to have SSL encryption on your site. For more details, please see our guide on how to get free SSL certification for a WordPress website.
Once you’ve connected Stripe with WP Simple Pay, you’ll be redirected to the setup wizard.
In the next step, the plugin will ask you to configure emails. For example, you can enable options to send payment receipts to customers, notify them about upcoming invoices, and get payment notifications.


Go ahead and enter your email address in the ‘Send to’ field and then click the ‘Save and Continue’ button.
After that, you’ll see the last step in the setup wizard. Go ahead and click the ‘Create a Payment Form’ button.


Create a Klarna Payment Form in WP Simple Pay
You can also create new payment forms by going to WP Simple Pay » Add New from your WordPress dashboard.
The plugin offers multiple pre-built form templates. To add Klarna, go ahead and select the ‘Klarna (Buy Now, Pay Later) Form’ template.


Next, you can customize your payment form.
For instance, under the ‘General’ tab, you get options to rename the form, add a description, and select a form type.


After that, you can switch to the ‘Payment’ tab.
Here, you’ll find payment mode settings and price options. The plugin lets you add multiple prices, the cost of the product, the currency that will appear in the form, and whether you’d want a one-time payment or a recurring subscription.


Next, you can scroll down and choose different payment methods.
Ensure that the ‘Klarna’ option is selected. You can also add more options like credit card and ACH Direct Debit.


From here, switch to the ‘Form Fields’ tab and choose which fields to add.
You can also change the order of existing fields by simply dragging and dropping them. Plus, there are more form fields to add from the dropdown menu at the top.


After editing the form fields, head to the ‘Payment Page’ tab. WP Simple Pay allows you to create a dedicated payment page for your Klarna form.
Just make sure to click the ‘Enable a dedicated payment page’ checkbox.


You can change the permalink for the page, select a color scheme, add the form title and description, add a logo, and change the text in the footer.
When you’ve made the changes, go ahead and publish your Klarna form. Now, visit the dedicated page to see the Klarna form in action.


Alternatively, you can embed the payment anywhere on your website using the WP Simple Pay block.
Simply edit a page or add a new one. Once you’re in the content editor, click the ‘+’ button, and then add the ‘WP Simple Pay’ block. Next, you just select your form from the dropdown menu.


After that, go ahead and publish your page.
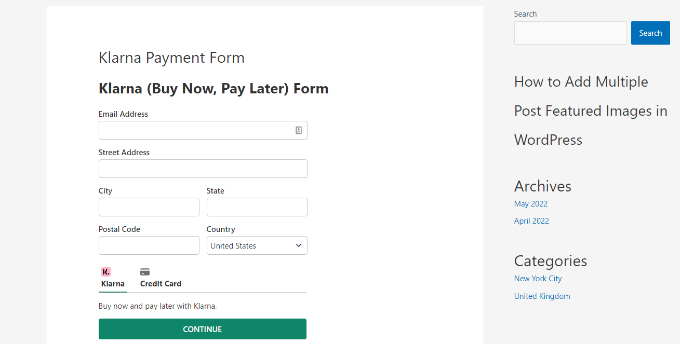
You can now visit your WordPress website to see the Klarna payment form in action.


Method 2: Add Klarna Payments in WooCommerce
You can also add Klarna payments in WordPress using the WooCommerce plugin. WooCommerce is the most popular eCommerce platform in the world, and it’s built on top of WordPress.
It has built-in payment options, but you can add a free Klarna Payments extension for your online store.
Before you can use Klarna in WooCommerce, first you need to make sure that you have setup an online store using WooCommerce.
After that, you’ll need to install and activate Klarna Payments for WooCommerce. For more details, please see our guide on how to install a WordPress plugin.
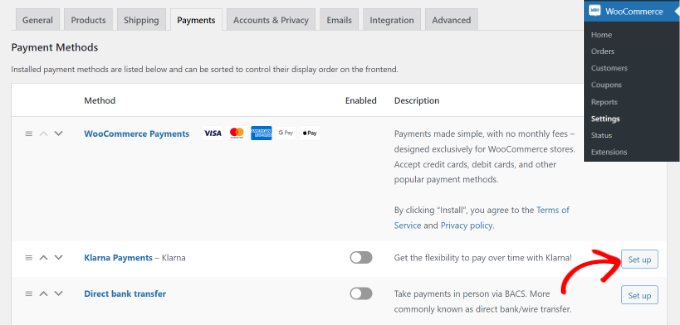
Upon activation, you can go to WooCommerce » Settings from your WordPress dashboard and click on the ‘Payments’ tab.


Here, you will have different payment options offered by WooCommerce, including Klarna Payments. Simply click the ‘Set up’ button in front of Klarna Payments.
Next, you can check the ‘Enable Klarna Payments’ to activate the payment service in WooCommerce.
Besides that, there are also options for changing the title, enabling test mode, showing your customers a link to what is Klarna, and more.


When you’re done, don’t forget to save your changes.
Next, you can go to your WooCommerce store and visit the checkout page to see Klarna as a payment option.


It’s important to note that Klarna Payments work with merchant accounts and is only available in Australia, Austria, Belgium, Canada, Denmark, Germany, Finland, France, Italy, Netherlands, Norway, New Zealand, Sweden, Spain, Switzerland, United Kingdom, and the United States.
We hope this article helped you learn how to add Klarna payments to WordPress. You may also want to see our ultimate guide to WordPress SEO and our beginner’s guide on how to start an email newsletter.
If you liked this article, then please subscribe to our YouTube Channel for WordPress video tutorials. You can also find us on Twitter and Facebook.
