How to Properly Add Images in WordPress (Step by Step)
Are you looking for the right way to add images to your WordPress website or blog?
By adding images in WordPress correctly, you can improve the visual appeal, accessibility, and SEO of your website. You can even allow users to upload their own images and use them on your site or in your competitions.
In this article, we will show you how to properly add images in WordPress.


The Importance of Correctly Uploading Images in WordPress
Sometimes, users directly copy an image from the source and paste it into their website content. Unfortunately, this can cause problems like slow pages, poor user experience, and poor SEO.
When you add images to your WordPress website, it’s important to do it properly. This means using the right file format, file name, and alt text.
We recommend naming your images with descriptive words separated by dashes. For example, you might use the file name ‘bali-vacation-photo.jpg’ for an image on your travel blog.
Properly adding images also means resizing your images so that they load quickly and look good on all devices. For example, some image formats like JPEG, are more compressed than others, which means that these images will take up less space on your server and will take less time to load.
By using these formats, along with an image compression plugin for the images on your WordPress blog, you can improve the user experience of your website.
Similarly, by using the Image block in WordPress and properly optimizing your images for SEO and alt text, you can make it easier for search engines to index your images.
This can increase your website’s rankings and improve the accessibility of your website for people with disabilities.
That being said, let’s see how to properly add images in WordPress. We will cover several methods, and you can use the quick links below to jump to the different sections of our tutorial:
How to Add Images in the Block Editor (Gutenberg)
You can easily add images in the WordPress block editor by using the Image block.
First, you need to open the existing or new page/post where you want to add an image.
Once you are there, click the ‘+’ button in the top left corner of the screen to open the block menu. From here, you must find and add the Image block to the post or page.


Once you have done that, click the ‘Media Library’ button to launch the ‘Select or Upload Media’ prompt on the screen.
From here, you can switch to the ‘Upload Files’ tab if you want to upload an image from your computer.
However, if you want to add an image from the media library, then you can also do that by switching to the ‘Media Library’ tab.


Upon adding an image, you will need to add alt text for it in the left column. This alt text is crucial for image SEO as it helps search engines understand the context of the image. It also allows people with screen readers to see this information about your images.
You can also add a title and caption describing the image in the right column. Captions are the visible text descriptions of your images, while the title will appear when a user hovers their mouse over the image.
For details, you may want to see our beginner’s guide on how to add captions to images in WordPress.
Next, just click the ‘Select’ button to add the image to your page or post.


Now that you have uploaded an image, you can further customize its size, dimensions, border, and style from the block panel on the right.
For details, check out our tutorial on how to add and align images in WordPress.


Finally, click the ‘Update’ or ‘Publish’ button to store your settings.
You have now properly added an image in the Gutenberg editor.
How to Add Images in the Classic Editor
If you are still using the old classic editor in WordPress, then you can use this method.
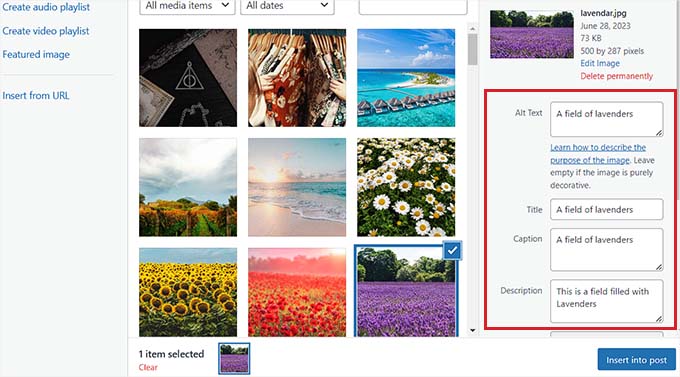
First, you need to visit the page or post where you want to add the image from the WordPress dashboard. Once you are there, just click the ‘Add Media’ button to launch the media library.


After that, you can switch to the ‘Upload Files’ tab to upload an image from your computer.
Alternatively, for adding an image from the media library, just switch to the ‘Media Library’ tab.


Upon adding an image, you will need to add alt text and a title for it. You can also add a description and caption if you wish.
You can simply describe the image for all these options. This will help search engine index your image and increase your website’s visibility.
Next, go ahead and click the ‘Insert into Post’ button.


Now, the image will be added to your WordPress post or page.
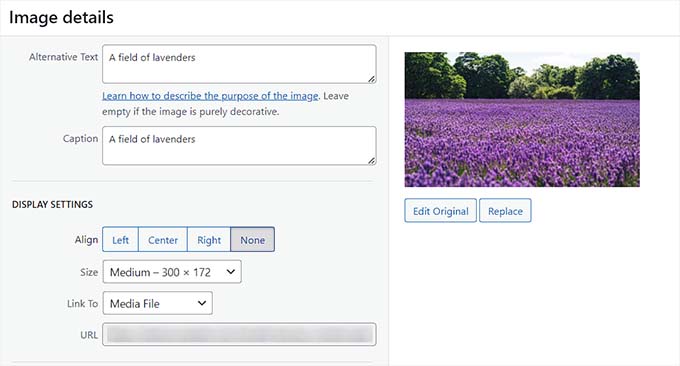
From here, you can change its alignment by using the alignment icons above the image. You can also further edit an image by clicking on the pencil icon.


This will open the ‘Image details’ prompt on your screen, where you can change the size and add image title attributes, CSS classes, alignment, and more.
Once you are done, just click the ‘Update’ button to save the changes you made.


After that, simply click the ‘Publish’ or Update’ button to save your post.
How to Add Images in the Media Library
If you want, you can also directly add an image to the media library. Keep in mind that after adding an image to the media library, you will still need to open a post or page and insert the Image block.
To add an image from the media library, you must visit the Media » Add New page from the WordPress admin area.
Once you are there, click the ‘Select Files’ button to upload an image from your computer. Then, click the ‘Edit’ link next to the image.


This will take you to the ‘Edit Media’ page, where you can start by changing the title for the image. After that, you can add alt text, a caption, and a description by scrolling down.
Once you have done that, you can also click on the ‘Edit Image’ button.


This will direct you to another page, where you can crop, scale, rotate, or flip the image according to your liking. For detailed instructions, please see our beginner’s guide on how to do basic image editing in WordPress.
Once you are satisfied, just click the ‘Update’ button to save your changes.


This will take you back to the ‘Edit Media’ page, where you have to click on the ‘Update’ button again to store your settings.
You have now successfully added an image to the media library.
Next, visit the post where you want to add this image from the WordPress admin sidebar. Once you are there, click the ‘+’ button to add an Image block to the post.
Next, you need to select the ‘Media Library’ button.


This will launch the ‘Select or Upload Media’ prompt on your screen, where you will notice the image that you uploaded in the media library at the top.
On selecting the image, you will see that its title, alt text, caption, and description have already been added to it from the media library page.
Now, simply click the ‘Select’ button to upload the image to the block editor.


Finally, click the ‘Publish’ or ‘Update’ button to store your settings.
How to Optimize an Image for WordPress SEO
Once you have added an image to a post/page, it is also crucial to optimize it for search engines. Unfortunately, WordPress does not offer any built-in advanced SEO features for images.
This is where All in One SEO for WordPress (AIOSEO) comes in.
It is the best WordPress SEO plugin on the market that makes it super easy to optimize your content, including images, for search engines.
First, you need to install and activate the AIOSEO plugin. For more instructions, see our step-by-step guide on how to install a WordPress plugin.
Note: AIOSEO also has a free version. However, you will need the pro version of the plugin to unlock the Image SEO feature.
Upon activation, you will have to configure the setup wizard.
For more details, see our guide on how to set up All in One SEO for WordPress correctly.


Next, head over to the All in One SEO » Search Appearance page from the WordPress admin sidebar and switch to the ‘Image SEO’ tab.
After that, scroll down and click the ‘Activate Image SEO’ button to unlock the feature.


You will now be able to see the Image SEO settings. Here, you will notice different tabs for the title, alt text, caption, description, and filename.
Configure Automatic Image Titles
Once you switch to the ‘Title’ tab on the Image SEO page, you can start by creating a title format for your images using smart tags.
These smart tags will then automatically generate title attributes for your images. This is what a visitor will see when they hover their mouse over your images.
For example, if you want each image title attribute to use the image title and the site title, then you can add these smart tags in the ‘Title Format’ field.


After that, you can also enable the Strip Punctuation option if you want AIOSEO to automatically remove some characters when creating an image title from the filename.
For example, if you use dashes when saving an image file like ‘an-example-image’, then you can choose the ‘Dashes (-)’ option in the ‘Characters to Convert to Spaces’ section.
Once you do that, AIOSEO will automatically remove these dashes and turn them into spaces, making the image title ‘an example image’.


After that, scroll down to the ‘Casing’ section.
From here, you can choose a casing option for your title. We recommend picking sentence case or title case to make your titles more readable.
Configure Automatic Alt Tags
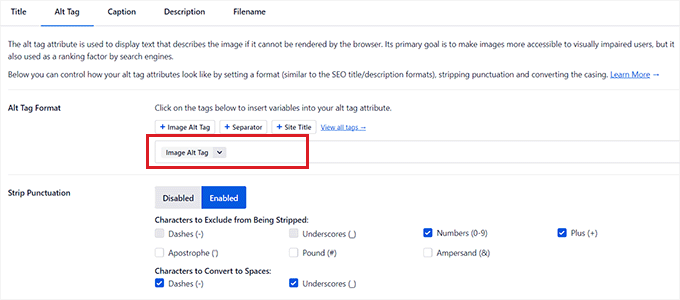
After configuring title settings, switch to the ‘Alt Tag’ tab from the top.
From here, you can use the smart tags next to the ‘Alt Tag Format’ option to automatically generate alt text for all your images.
After that, you can also enable the Strip Punctuation setting if you want characters like dashes (-) or underscores (_) to be converted into spaces.


Similarly, if there are characters like numbers or plus signs (+) that you don’t want AIOSEO to strip when creating the alt text, then you can check the boxes for these options in the ‘Characters to Exclude from Being Stripped’ section.
You can also select a casing for your alt text.
Configure Automatic Captions and Descriptions
To generate automatic captions for your images, switch to the ‘Captions’ tab.
From here, make sure that the ‘Autogenerate Caption on Upload’ option is enabled. You can then select the smart tags that will be used to generate captions for your images.


Next, you can also use the Strip Punctuation feature to exclude or include characters in the captions and choose a casing for them.
Once you are done, you need to switch to the ‘Description’ tab from the top.
From here, make sure that the ‘Autogenerate Description on Upload’ option is enabled. You must also select the smart tags you want to use for generating automatic image descriptions.


Next, you can also use the Strip Punctuation feature to include/exclude characters like underscores, apostrophes, or numbers in the description.
After that, simply select a casing for your image descriptions.


Configure Automatic Filenames
As we mentioned earlier, we recommend giving your image files SEO-friendly file names. You can do this before uploading your images, or AIOSEO can do it for you automatically.
Once you switch to the ‘Filename’ tab from the top, you will notice that AIOSEO has already configured the Strip Punctuation setting for you.
However, if there are any more characters that you want AIOSEO to delete from your image filenames when creating titles or alt text, then you can type those characters into the ‘Words to Strip’ box.


After that, you can also select a casing for your filenames.
Once you are done, don’t forget to click the ‘Save Changes’ button to store your settings.
You have now successfully optimized your images for SEO, and AIOSEO will automatically generate titles, alt text, captions, and descriptions for all your images.
For more detailed instructions, please see our beginner’s guide on how to optimize images for search engines.
Bonus: Allow Users to Upload Images in WordPress
You may also want to allow your users to upload their own images to your WordPress website. This can come in handy if you are hosting a contest or running a photography website that accepts user-generated images.
For this, you can use WPForms, which is the best contact form plugin on the market. It comes with a drag-and-drop builder that makes it super easy to create any kind of form you want, including an image submission form.
First, you will need to install and activate the WPForms plugin. For details, see our instructions on how to install a WordPress plugin.
Upon activation, head over to the WPForms » Add New screen from the WordPress dashboard to launch the form builder.
From here, you need to type a name for your form and then click the ‘Use Snippet’ button under the ‘Simple Contact Form’ template.


This will load the form template in the form builder, where you will notice its preview on the right and the available fields in the left column.
From here, go ahead and drag and drop the File Upload field onto the form and click on it to further customize its settings.


From here, you can change the label and description of the field and even specify the extensions that are allowed.
For example, if you want to allow JPEG and PNG files only, then you must type these options into the ‘Allowed File Extensions’ field. Keep in mind to separate each extension with a comma.
After that, you can also configure the maximum image file size and number of uploads in the left column.


For more detailed instructions, you may want to see our tutorial on how to allow users to upload images in WordPress.
Once you are done, just click the ‘Save’ button to store your settings.
Next, open the page/post where you want to add the image upload form. Once there, click the ‘+’ button in the top left corner of the screen to open the block menu
From here, you need to add the WPForms block to the page/post.


Just choose the image file upload form that you created from the dropdown menu.
Finally, click the ‘Update’ or ‘Publish’ button to store your settings. Now, you can visit your WordPress site to view the form in action, and visitors will be able to submit their images using the form.
We hope this article helped you learn how to properly add images in WordPress. You may also want to see our beginner’s guide on how to change the block height and width in WordPress, and our expert picks for the best WordPress themes for graphic designers.
If you liked this article, then please subscribe to our YouTube Channel for WordPress video tutorials. You can also find us on Twitter and Facebook.
