How To Live Stream Recorded Videos To Facebook Page For Free
Videos have taken the digital marketing world by storm!
Being an entrepreneur, your job is to ensure your social media subscribers receive a decent number of engaging content on a regular basis. And the most engaging kind of content is video content.
Creating new video content is not usually as simple as text content because video content takes more time and resources to create.
Want me to share a trick that you can use to easily churn out more video content?
Well, in this article, you will be learning exactly how you can live stream your existing videos onto a Facebook page. Since live videos get more visibility than normal uploaded videos, you will be making your existing content reach more people.
Just follow the outlined steps to live stream any of your existing videos from your desktop to your Facebook page.
How To Stream Live On Facebook Page From Desktop Using Pre-Recorded Videos:
The first thing you need is the “Stream Key” from your Facebook page. This is a unique key that every page has which will enable us to use the streaming software we need.
Here is how you can get it:
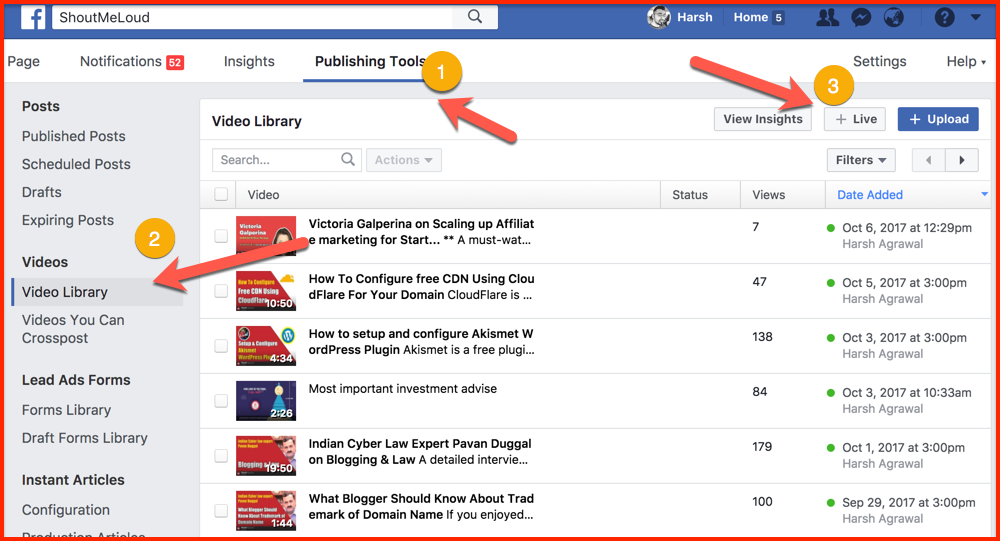
- Go to your Facebook page and click on Publishing Tools > Video Library > +Live.
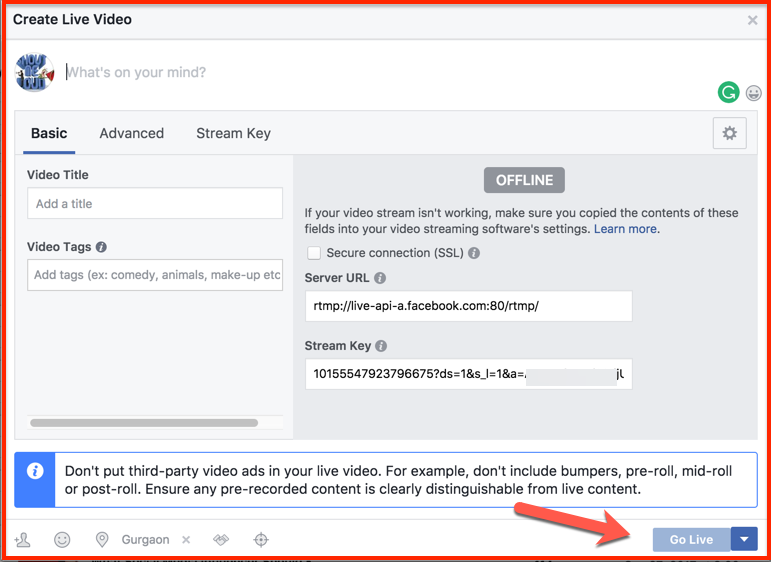
This will bring up a pop-up where you should copy down the “Stream Key”.
As per Facebook: Keep the Stream Key secret. Anyone can use them to stream video to your post. This stream key is valid for 7 days. Once you preview the video, you have up to 5 hours to go live. If you need more time, create a new stream key closer to the time.
- Click on Next and you will see the “Create Live Video” screen as shown below.
Do not close this window. After we configure the streaming software, we will be using the screen above to go live.
Configuring Open Broadcaster Software (OBS) For Streaming Pre-Recorded Video As Live Video On Facebook:
- Download and install Open Broadcaster Software (OBS) for your computer’s OS (download link).
- Open the OBS application.
- Click on Settings > Stream and then paste the stream key in the Stream key field.
- Click on OK.
Now, click on the + icon in the Sources field and select VLC Video Source.
Now, we need to create a playlist. This playlist could consist of one video or more than one video. This completely depends on your goal. For this tutorial, I’m streaming only one video.
- Give a name to the playlist and click on OK.
On the next screen, you should configure how you want the stream to happen. For example, live streaming should work only when the software is running in the foreground, or you can configure it to stream when the software is minimized.
In my case, I’m letting it stream even after the video is minimized by using the option “Always play even when not visible”.
You can add as many videos as you like by clicking the “+” icon.
- Click on OK to add this video to your streaming list.
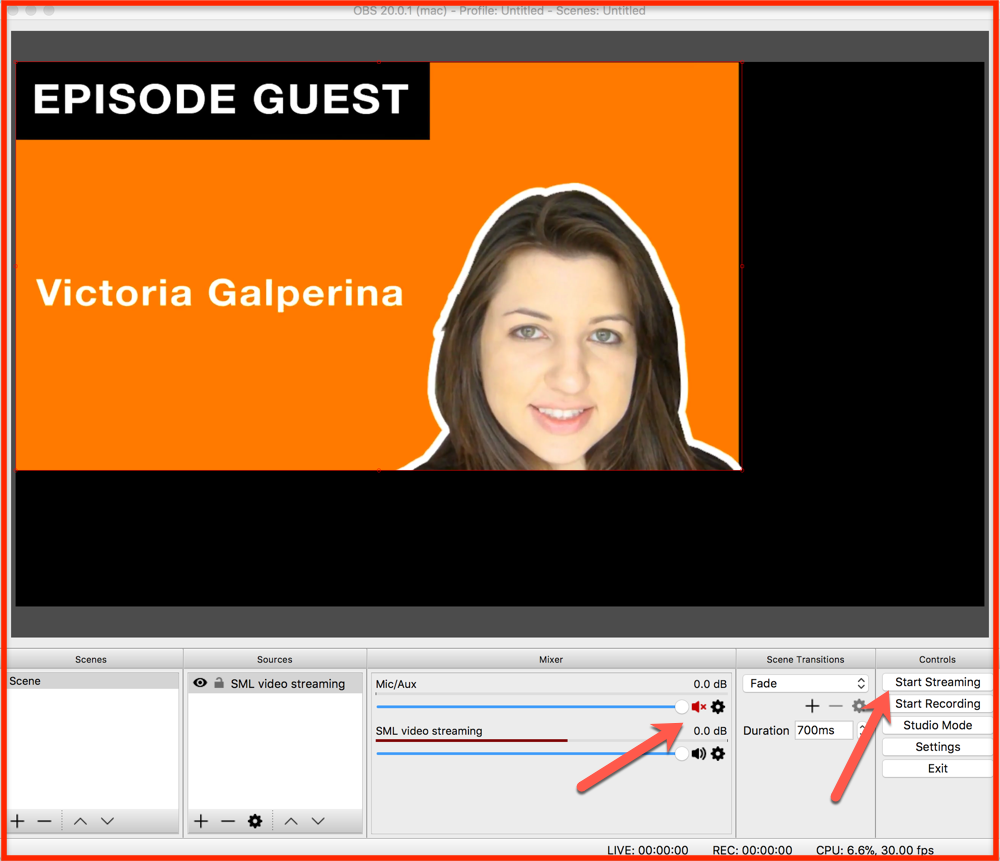
- Mute the Mic/Aux.
- Click on Start Streaming.
- Now, go back to the Facebook window and click on Go Live.
If you have followed all steps as mentioned, you will see a screen like this:
You should test this first as a trial video to get the hang of how OBS and this whole “pre-recorded live streaming” thing works.
There are a couple of issues that you may face:
- You need to manually end the live stream. If not, the stream will keep going in a perpetual loop.
- Streaming video from the 0.00 second mark on Facebook. You can overcome this by configuring the streaming delay in OBS Settings > Advanced.
OBS is indeed one of the best free solutions for live streaming pre-recorded videos. There are also many other solutions that offer advanced features which could be better for any digital marketing companies acting on behalf of a client.
Here are some other (paid) solutions:
- Onestream.live
- Wirecast (very popular and supports more social channels)
- Ecamm Live (free trial, then one-time purchase of $29)
For a blogger or startup who is looking for a free solution, OBS is definitely the best at this moment.
Go ahead and stream some of your existing videos on your Facebook page. It may take 2-3 times before you get the whole process right, but if you follow these instructions, you should have no problem.
After you try, come back and let me know how it goes. I look forward to hearing your results in the comments!


